Google Tag Manager Integration - Voucher Network & Checkout Benefits
This documentation helps you successfully integrate and configure Sovendus Voucher Network and/or Checkout Benefits on your website via Google Tag Manager, as an alternative to direct code integration.
Ad Blocker Impact Warning
Google Tag Manager is often blocked by ad blockers. We strongly recommend using a plugin or direct integration instead, as 5%–10% of traffic may be lost otherwise.
Prerequisites
If you are new to Google Tag Manager, please familiarise yourself with the official documentation before setting up the Sovendus integration:
Additionally, we would be happy to provide an integration setup demo video, if required. Please reach out to your Customer Success Manager if you are interested in this.
Implementation Guide
Step 1 – Access Google Tag Manager
Getting Started with GTM
Log in to the GTM account for the site where you want to implement Sovendus.
Quick Steps:
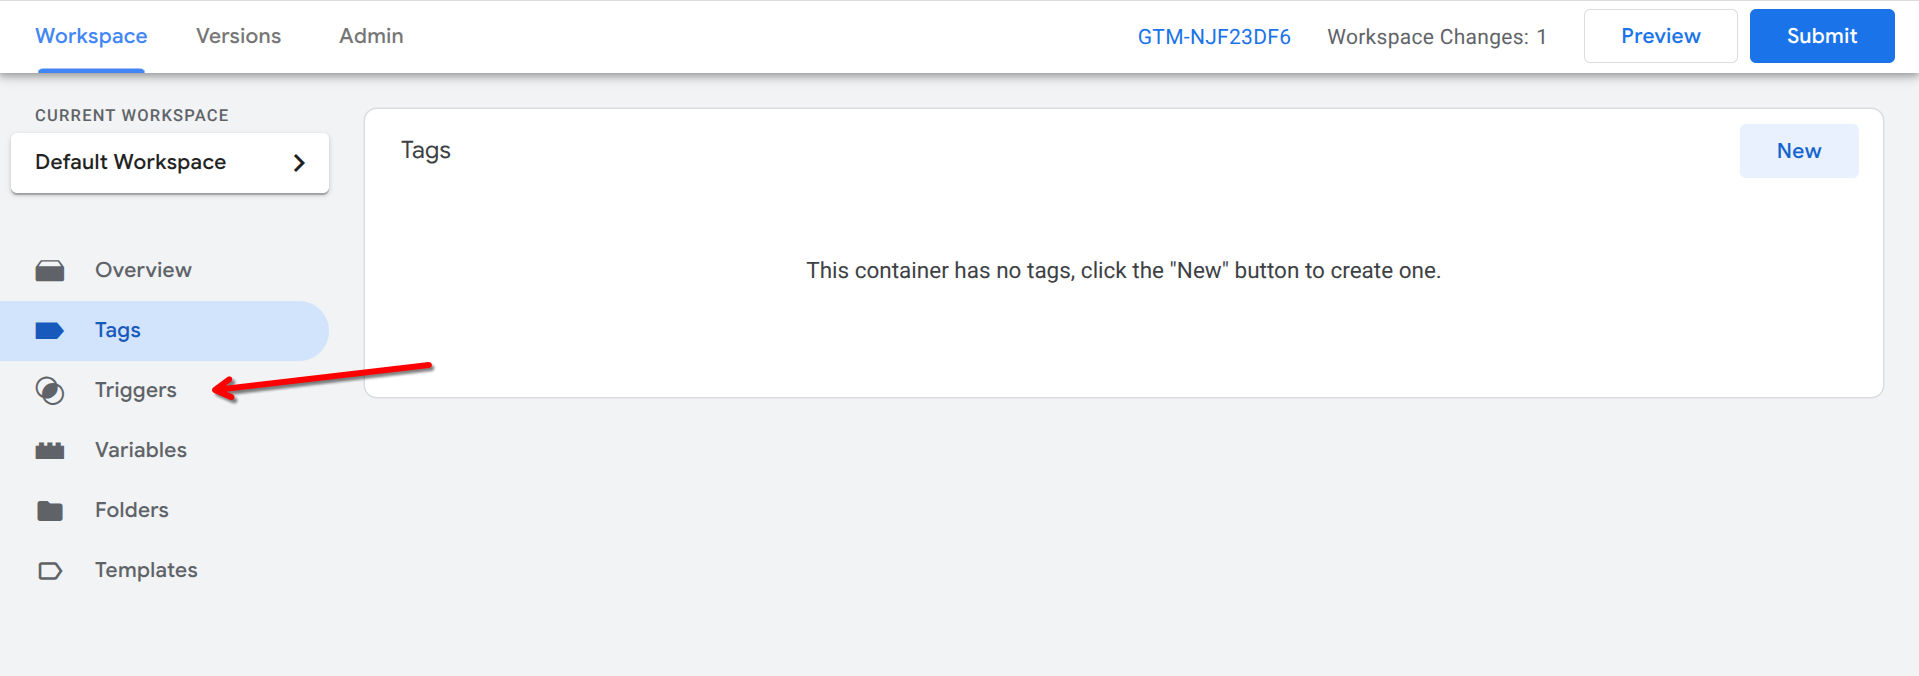
Navigate to the Tags section
Click New to add a new tag
Give your tag a descriptive name (e.g., "Sovendus Integration")
Step 2 – Find and Install the Sovendus Template
Template Installation Process
Follow these steps to locate and install the official Sovendus template from the GTM gallery.
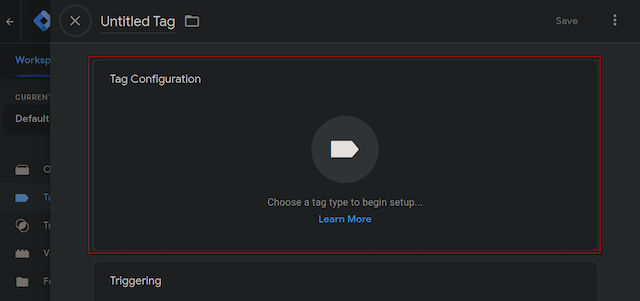
Step 2.1: Open Tag Configuration
Click on Tag Configuration to open the tag type selector.
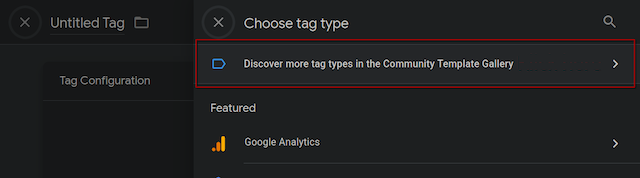
Step 2.2: Access Template Gallery
Click on Discover more tag types... to browse the community template gallery.
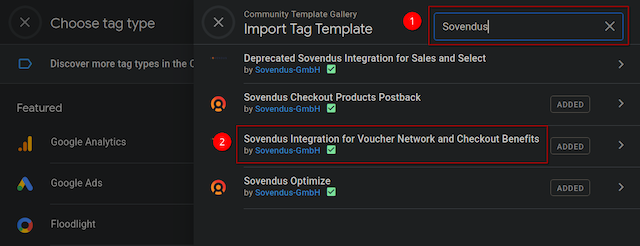
Step 2.3: Search for Sovendus
Search for Sovendus and select Sovendus Integration for Voucher Network and Checkout Benefits.
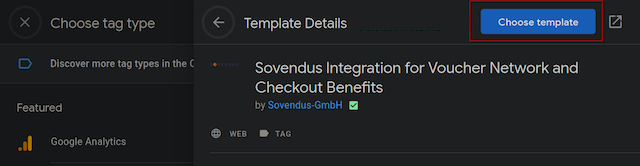
Step 2.4: Confirm Installation
Click Choose template to add it to your GTM container.
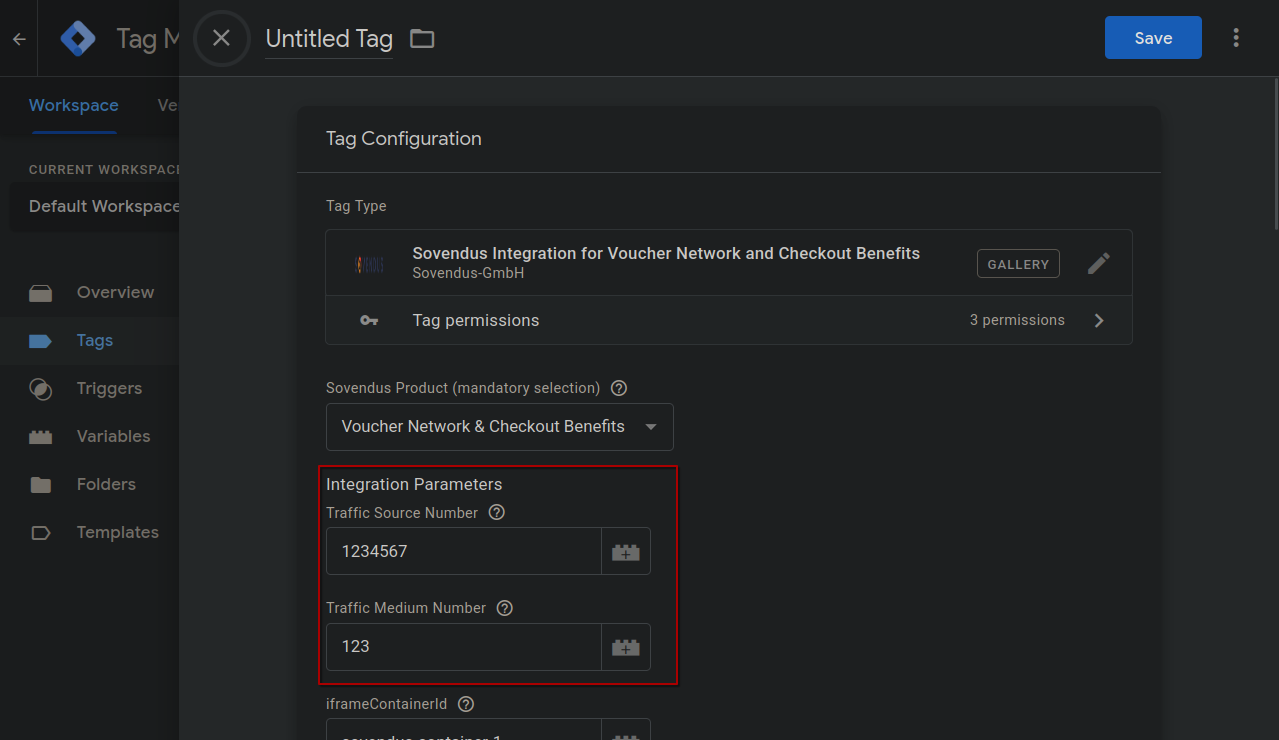
Step 3 – Configure Traffic Numbers
Configuration Overview
Configure your Sovendus Tag with the Traffic Source and Traffic Medium Numbers provided by your Account Manager/Customer Success Manager. Choose between single or multi-country setup based on your needs.
Option A: Single Country/Language Configuration
Simple Setup for Single Market
Perfect for websites operating in one country or language. Simply enter your Sovendus identifiers directly.
Configuration Steps:
Enter your Traffic Source Number (provided by Sovendus)
Enter your Traffic Medium Number (provided by Sovendus)
Verify the numbers match what you received from your account manager
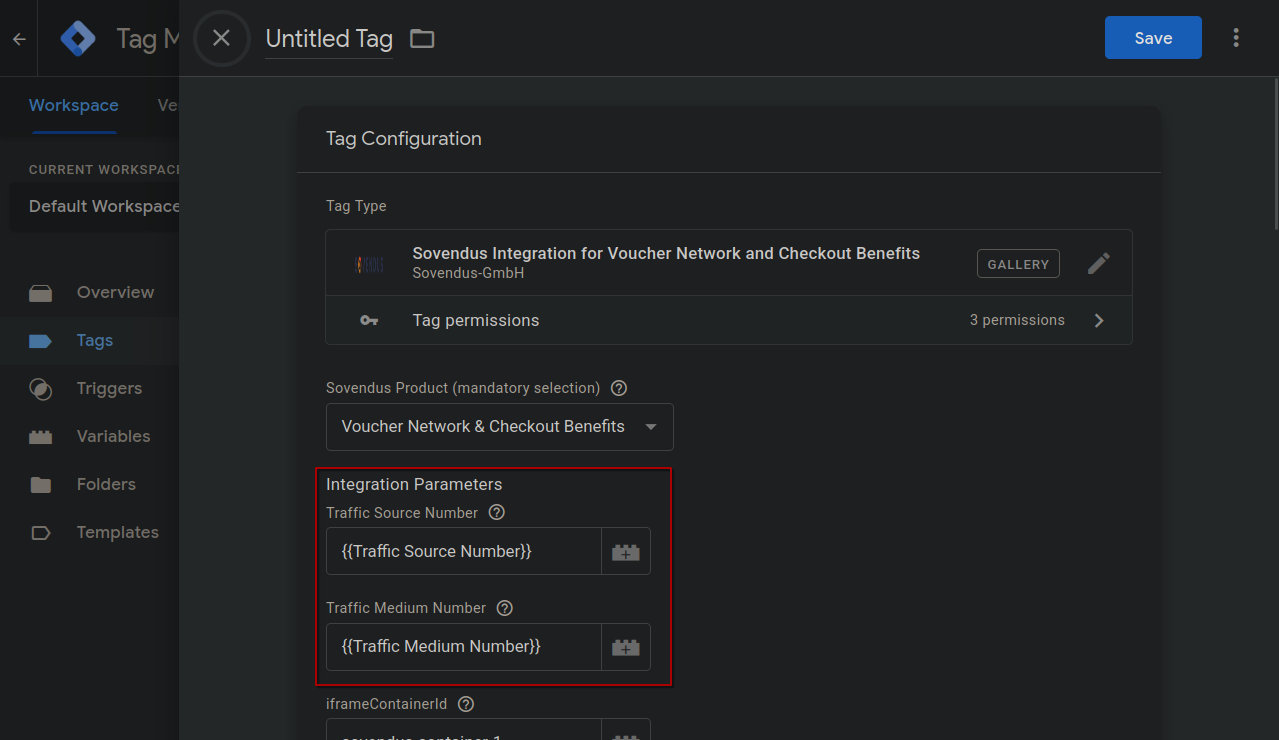
Option B: Multi-Country/Language Configuration
Advanced Configuration Required
For websites serving multiple countries or languages, you'll need to create GTM variables that dynamically return the correct identifiers.
Create Variables in GTM:
Navigate to Variables section in GTM
Create variables that return appropriate numbers per locale
Variables should return empty string if country/language not supported
Variable Creation Methods:
URL-based detection (e.g., /en/, /de/, /fr/)
Data layer variables from your website
Custom JavaScript variables
Lookup tables based on domain or subdomain
Implementation Example:
Step 4 – Select Your Sovendus Products
Product Selection Guide
Choose the Sovendus products you want to integrate. Each product requires different order and customer data parameters.
Available Products:
Voucher Network - Display relevant vouchers and offers to customers
Checkout Benefits - Show exclusive benefits during checkout process
The hasConsent parameter is critical for GDPR and privacy compliance. This parameter allows the user's provided level of consent to easily be transferred to the Sovendus integration. Sovendus will then tailor functionality accordingly, as below
Please Note
This hasConsent parameter is only relevant for partners who have signed a Data Processing Agreement with Sovendus, and who have been enabled for this functionality - if you are unsure, or have any queries, please reach out to your Customer Success Manager
Scenario
Value
Description
✔ Consent has been explicitly provided
hasConsent
=
true
The Sovendus integration loads successfully with full functionality, such as additional analytics, user recognition and personalisation of offers
✘ Consent has not been explicitly provided
hasConsent
=
false
The Sovendus integration loads successfully, but with minimal usage data (anonymised)
Consent Variable in GTM:
In most cases, a GTM variable will be the best way to handle this. The exact method to determine/set this variable will depend on your particular Consent Management Platform and processes, but please see the general variable creation process below:
Navigate to the Variables section in GTM
Create a boolean variable (if one does not already exist) to return a true or false value, depending on the user's provided level of consent
This variable can pull from the Data Layer, a particular cookie value, or any other relevant value, depending on your Consent Management setup
Once created, add this variable to the 'hasConsent Parameter' field within the Sovendus Template, as shown with the CookieConsentBool example variable above
Step 6 – Configure Other Required Parameters
Data Layer Requirements
Ensure your data layer contains the required order and customer information before configuring variables. If they don't exist, add them to your website's data layer implementation.
For detailed parameter descriptions, data types, required vs optional fields, and implementation examples, see the comprehensive Sovendus Parameter Guide .
Order Data Configuration
Map your order data from the data layer to these Sovendus parameters (order ID, value, currency, session ID, coupon code).
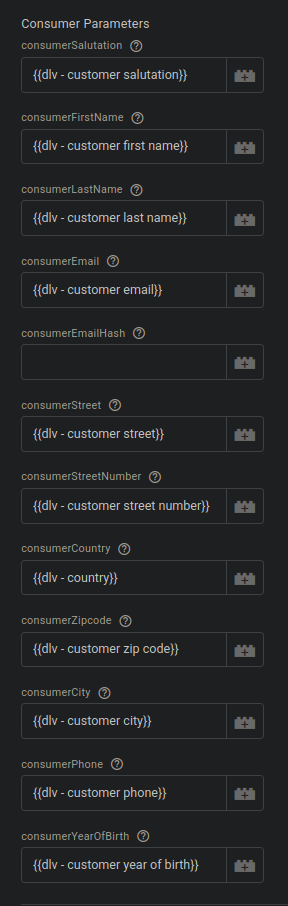
Customer Data Configuration
Map your customer data from the data layer to these Sovendus parameters (name, email, address fields for personalization).
Step 7 – Create the Sovendus Display Container (if required)
When is the container required?
The container is only required when one of the following is true for you:
You are using an Inline/Embedded version of our banner or product list
You are using a SPA (single page app - e.g. react, angular, vue, etc.) as the existence of this container will trigger the sovendus overlay removal process
If you are using a Sticky banner or an Overlay (without an SPA), then this container is not required
Container ID Must Match
The display container's ID must exactly match the iframeContainerId value in your Sovendus tag configuration. Mismatched IDs will prevent the integration from working properly.
Choose Your Container Setup Method
You have two options - as follows - for adding the Sovendus container to your thank-you/confirmation page. Choose the method that best fits your technical setup.
Option A: Direct HTML Integration
Manual HTML Implementation
Add the container directly to your thank-you page HTML. This method is recommended wherever possible, as it provides the easiest control over placement.
Implementation Methods:
Edit your thank-you page template directly
Use your CMS or page builder's custom HTML feature
Add via your theme's template files
HTML Code: The following code example will add a blank div container. As long as the id matches what is specified within the Sovendus script/Tag, the Sovendus Inline/Embedded integration will load inside this container:
Placement Tips:
Position after order confirmation details
Ensure adequate spacing from other elements
Consider mobile responsiveness
Option B: GTM Custom HTML Tag
GTM Container Creation
Create the container using Google Tag Manager's Custom HTML tag. This method is useful when you can't directly edit your thank-you page HTML. However, simply adding the empty div container element is usually insufficient, as this doesn't allow for specific placement - as such, a querySelector or similar should be used (as below)
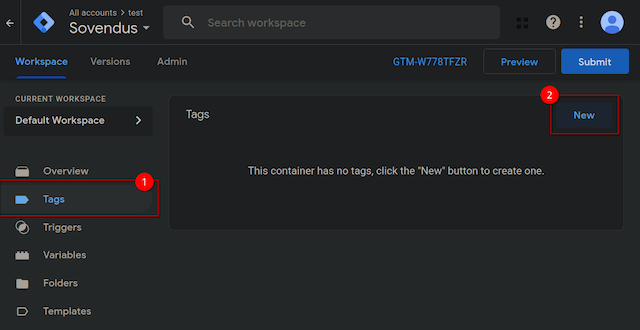
Navigate to the 'Tags' section in GTM
Click the 'New' button
Name the tag (e.g. "Sovendus Container")
Configure Custom HTML:
Click 'Tag Configuration'
Search for 'Custom HTML' and select it
Add Container HTML:
Into the 'HTML' field, paste the relevant code to allow you to create and place the div container into the correct location. Please note - the below is just an example, and your exact code may vary.
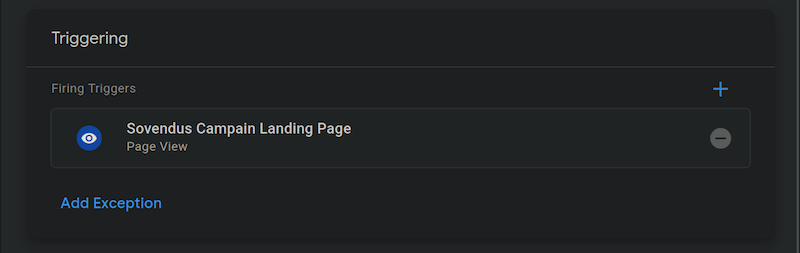
Step 8 – Create and Set a Trigger
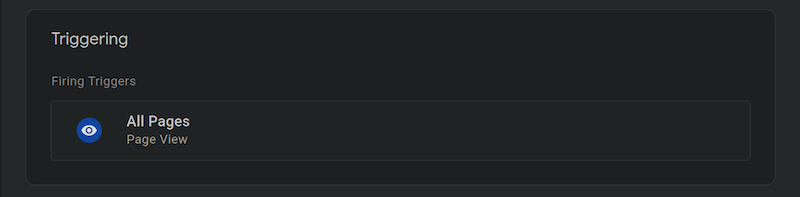
If you don’t already have a trigger for your thank-you/confirmation page, follow these steps (you can skip these steps if you already have a thank-you page trigger and go to the assignment steps below):
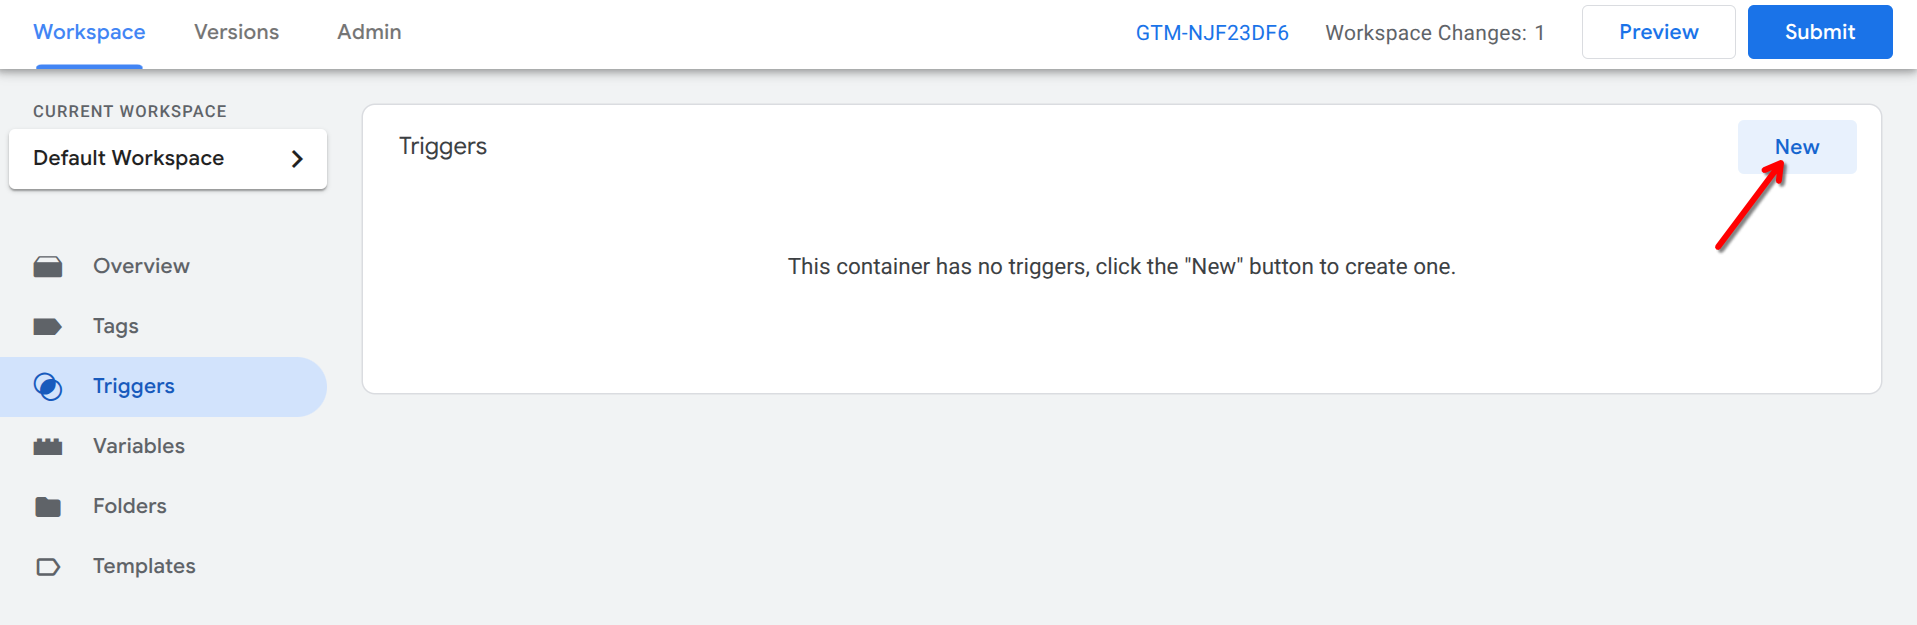
1. Click on the 'Triggers' tab in the left menu
2. Click 'New' to create a new trigger
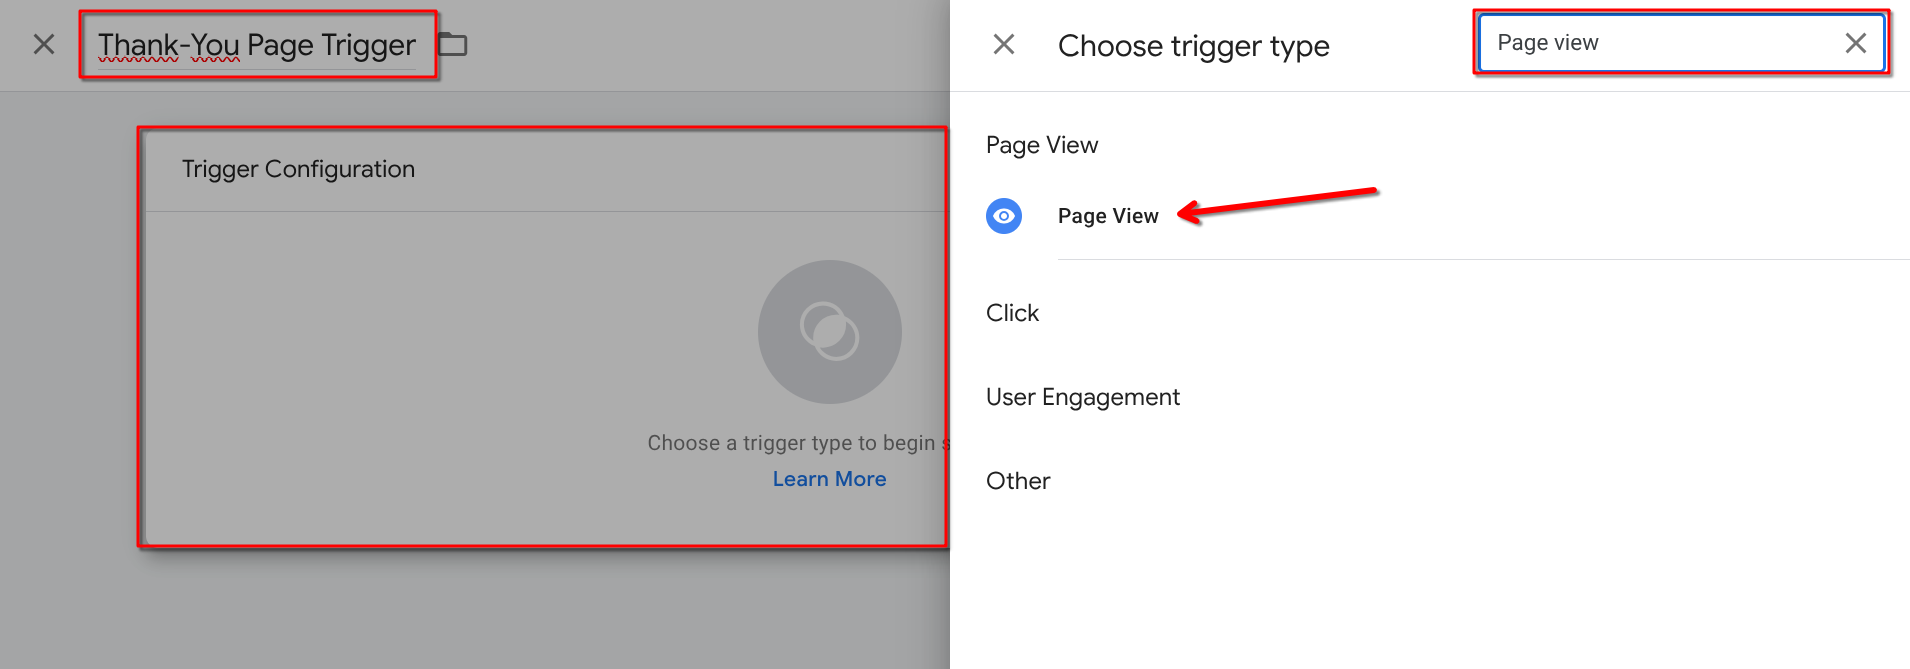
3. Name your trigger (e.g. "Thank-you Page Trigger")
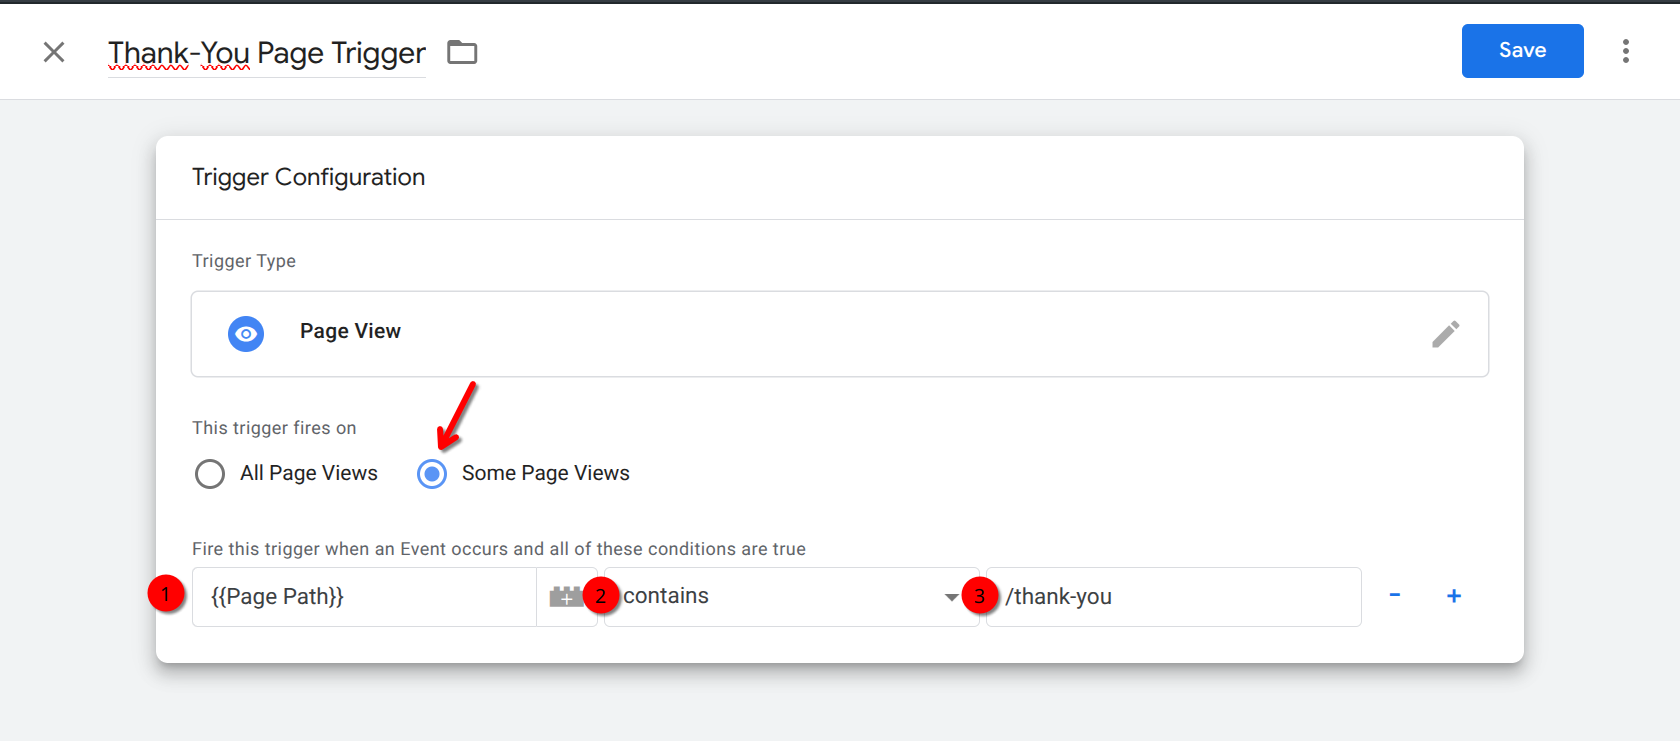
4. Under 'Trigger Configuration', select 'Page View'
5. Under 'This trigger fires on', select 'Some Page Views'
6. In the 'Fire this trigger on' section, specify the conditions that will cause the trigger to fire. In this case, you will want to select 'Page Path' from the dropdown menu and set the 'contains' operator
7. Then, enter the page path of your thank-you page in the value field. For example, if your
thank-you page is at "example.com/thank-you", you would enter "/thank-you" in the value field
8. Click 'Save' to create the trigger. Now, any Google Tag Manager tags that are associated
with this trigger will fire on the thank-you page whenever the trigger conditions are met
Alternative trigger options
Instead of using the page path as a trigger, you could instead use a purchase event or similar. Depending on your site and setup, this can sometimes help to ensure reliable and fast firing of the Sovendus integration
Now assign this trigger to the relevant Sovendus Tag
Now the trigger is created, you will need to assign it to the relevant Sovendus Tag:
If the Display Container Tag has been created within GTM (Step 7 - Option B, above), then only this Display Container Tag should have the firing trigger applied to it. As long as the process has been completed correctly, the Tag Sequencing will then ensure the Sovendus Integration (Template) Tag is fired afterwards. Adding the trigger to both Tags is not advised, as this can lead to double-firing issues
If the Display Container Tag has not been created within GTM, then the Sovendus Integration (Template) Tag instead should have the firing trigger applied to it
Test Your Integration Before Publishing
Before publishing the changes you made in Google Tag Manager, you should test the integration to ensure that the Sovendus banner is correctly displayed on your Thank-you page.
If you're operating in Switzerland, you must add an additional landing page script to ensure proper compliance and attribution tracking. Why is this required?
Provides proper attribution tracking for Swiss traffic
Required for all Swiss Sovendus integrations
Ensures optimal performance of the Sovendus integration in Switzerland
Swiss Landing Page Script Setup
Step 1: Create New Custom HTML Tag
Create New Custom HTML Tag
Navigate to Tags section in GTM
Click New button
Name the tag "Sovendus Swiss Landing Script"
Click Tag Configuration
Search for and select Custom HTML
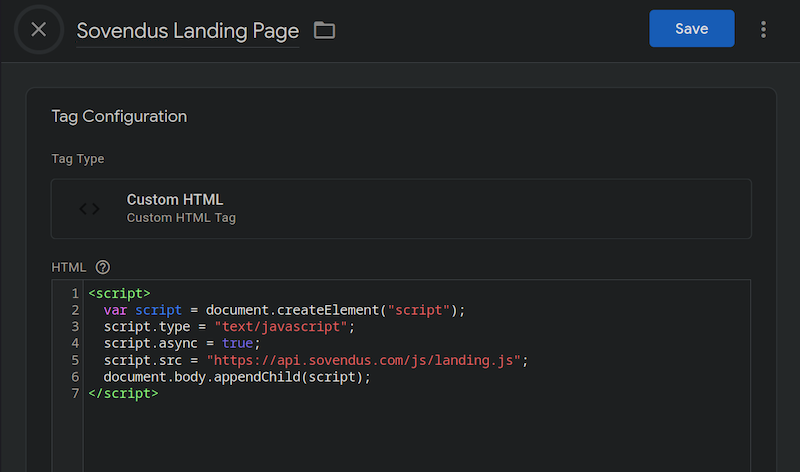
Step 2: Add Swiss Landing Script Code
Add Swiss Landing Script Code
Copy and paste this exact code into the HTML field:
You have two options for configuring the landing page trigger based on your needs:
Option A - Universal Landing Page Setup/Trigger (Recommended)
This option fires the script on all pages of your website, which is the simplest and most reliable approach.
Configuration Steps:
Create a new trigger using the process from Step 7
Name it "Swiss Landing - All Pages"
Under Trigger Configuration, select Page View
Under This trigger fires on, select All Page Views
Click Save to create the trigger
Option B - Specific/Targeted Campaign Pages Setup/Trigger
Use this option if you want to limit the script to specific landing pages or campaign pages only.
Step 1: Create New Trigger
Create a new trigger using the process from Step 7
Name it "Swiss Landing - Campaign Pages"
Step 2: Configure Trigger Type
Under Trigger Configuration, select Page View
Under This trigger fires on, select Some Page Views
Step 3: Set Page Conditions Set conditions for your specific pages:
Page Path contains /campaign/
Page Path contains /landing/
Need Support?
Contact your Sovendus Customer Success Manager if you encounter any issues or need assistance with the integration.
You can use a custom JavaScript variable to determine the correct traffic source number based on the URL path.
// Example: URL-based country detectionfunction(){var path ={{PagePath}};switch(true){case path.indexOf('/de/')===0:return'12345';// German traffic sourcecase path.indexOf('/fr/')===0:return'67890';// French traffic sourcedefault:return'';// In other cases, return empty string }}
<
script
>
(
function
(
)
{
// Create the div element
var
div
=
document
.
createElement
(
'div'
)
;
// Add the ID
div
.
id
=
"sovendus-container-1"
;
// Get reference to a particular element on the page - this will be specific to your site
var
element
=
document
.
querySelector
(
"#idToReference"
)
;
// Inject the new div directly after the referenced element
if
(
element
)
{
element
.
parentElement
.
insertBefore
(
div
,
element
.
nextSibling
)
;
}
}
)
(
)
;
<
/
script
>
Points to consider
The display container may not appear (or may ‘pop in’ later) if the referenced element is not yet loaded
It may also stop appearing if the site's content/structure is changed at a later date
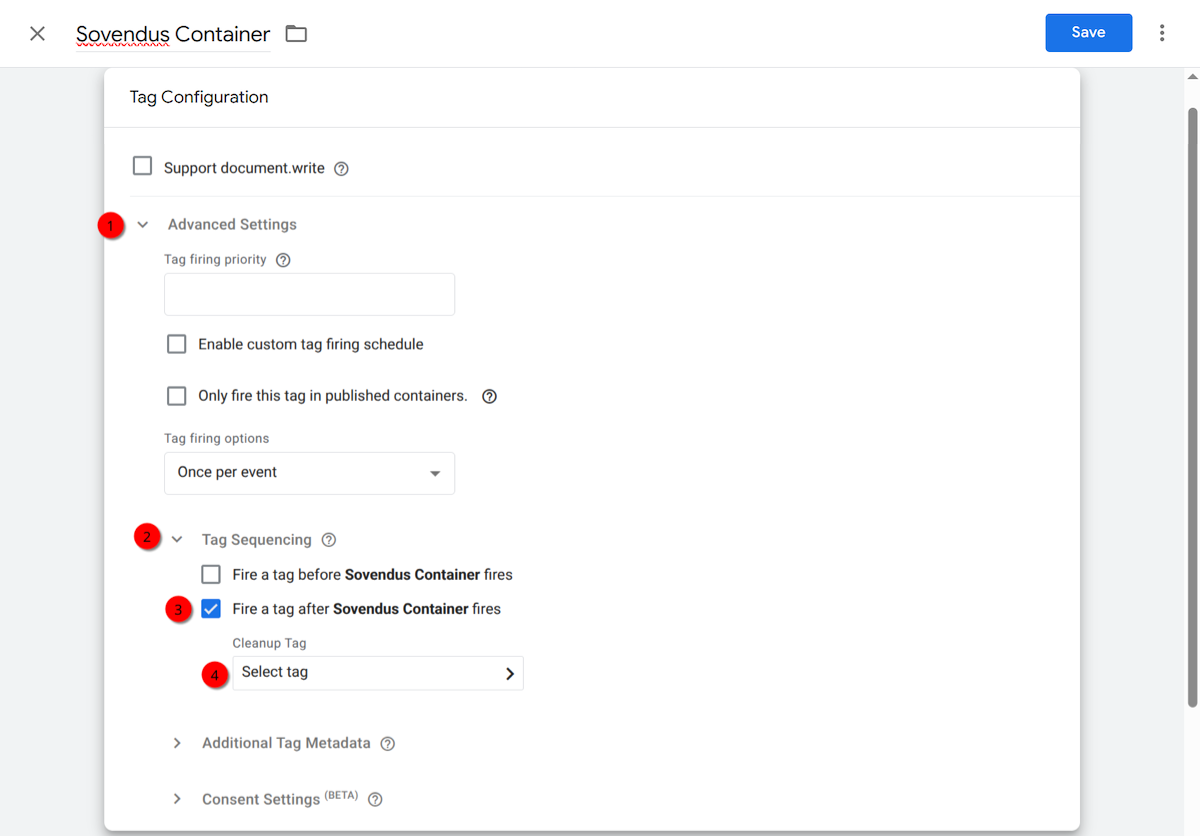
Set Tag Sequencing:
In the 'Tag Sequencing' section, select "Fire a tag after Sovendus Container fires"
In the 'Cleanup Tag' box, search for and select your Sovendus Template Tag
This ensures the container loads before the Sovendus content, which helps to avoid potential timing issues
true
;
script
.
src
=
"https://api.sovendus.com/js/landing.js"
;
document
.
body
.
appendChild
(
script
)
;
<
/
script
>
Page Path equals / (for homepage)
Step 4: Finalize Configuration
Add multiple conditions as needed for your landing pages
 Create Variables in GTM:
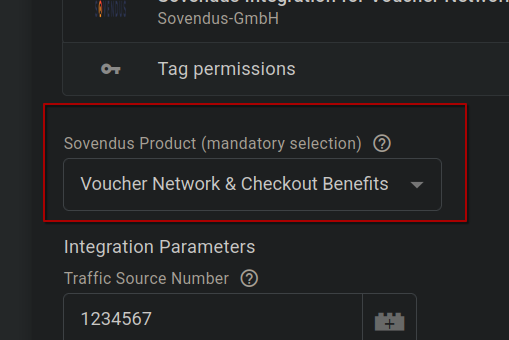 Available Products:
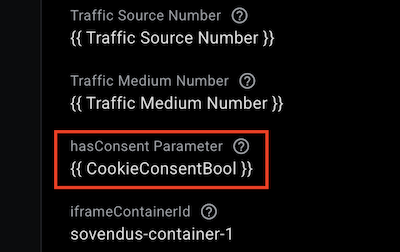 In most cases, a GTM variable will be the best way to handle this. The exact method to determine/set this variable will depend on your particular Consent Management Platform and processes, but please see the general variable creation process below:
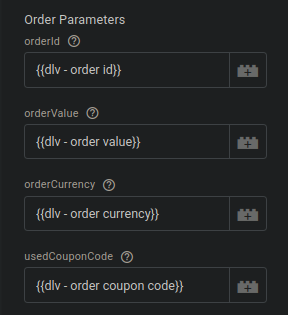
 Placement Tips:
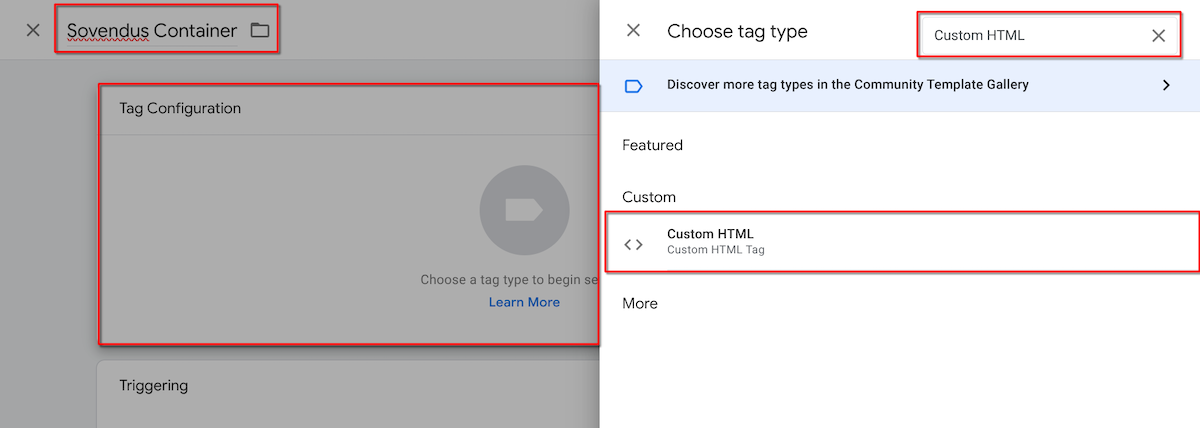 Add Container HTML: